Solving Lever Questions in Mechanical Aptitude Tests
A lever is a simple machine that consists of a rigid bar or beam, free to pivot or rotate around a fixed point called the fulcrum. Levers are used to transmit and magnify force, making it easier to move or lift heavy objects, or to perform tasks that require force. The principle of levers is based on the concept of mechanical advantage, which is the ratio of the output force (load) to the input force (effort).
Levers play a crucial role in mechanical systems for several reasons:
Mechanical advantage: Levers can amplify the applied force (effort), enabling us to move heavy loads with relatively little effort.
Direction change: Levers can change the direction of the applied force, making it easier to perform tasks that require force to be applied in a specific direction.
Distance and speed variation: Levers can increase or decrease the distance and speed of movement, allowing for greater control and precision in mechanical systems.
Energy conservation: Levers help conserve energy by ensuring that the input work is equal to the output work, making them efficient tools for transferring and transforming energy.
Versatility: Levers are used in a wide variety of applications, from simple hand tools to complex machinery, due to their ability to manipulate force, distance, and direction.
Real-world examples of levers
Looking for prep material on this topic?
Practicing is a proven way to score higher on your Mechanical Aptitude Test. Find full prep packages to ace your assessment!


Here are some common examples of levers that we encounter in everyday life:
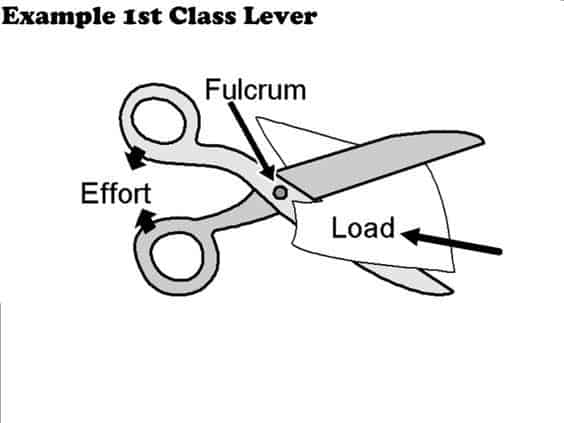
First-class levers:
a. Crowbar: A crowbar is used to pry open objects or lift heavy items. The fulcrum is placed near the object being lifted, the effort is applied at one end, and the load is located at the other end.
b. Scissors: Scissors consist of two first-class levers combined. The pivot point (fulcrum) is at the center, the effort is applied at the handles, and the load is the material being cut.
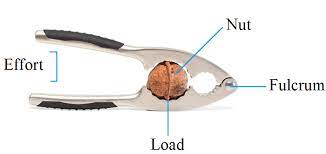
Second-class levers:
a. Wheelbarrow: A wheelbarrow is used to transport heavy loads. The fulcrum is the wheel, the effort is applied at the handles, and the load is located between the fulcrum and the effort.
b. Nutcracker: A nutcracker uses a second-class lever to crack open nuts. The fulcrum is at one end, the effort is applied at the other end, and the nut (load) is placed between the fulcrum and the effort.
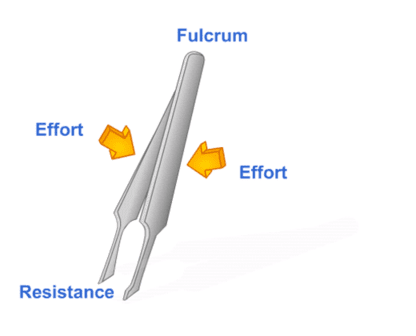
Third-class levers:
a. Tweezers: Tweezers are used to pick up small objects. The fulcrum is at one end, the load is located between the fulcrum and the effort, and the effort is applied at the other end.
b. Broom: A broom uses a third-class lever to sweep debris. The fulcrum is where the broom handle rests against the floor, the load is the debris being swept, and the effort is applied by the person holding the broom handle.
Understanding the principles of levers and their various applications will enable you to solve lever-related problems and better appreciate the importance of levers in our daily lives.
As we continue our lesson on levers, we will delve deeper into the components of a lever, the different types of levers, and their mechanical advantages. By learning these concepts, you'll be better equipped to tackle lever questions on mechanical aptitude tests and apply your knowledge of levers to practical situations.
Components of a Lever
Looking for prep material on this topic?
Practicing is a proven way to score higher on your Mechanical Aptitude Test. Find full prep packages to ace your assessment!
A lever consists of several key components that work together to transmit and magnify force. Understanding these components will help you analyze and solve lever problems effectively.
Load
The load, also known as the resistance or output force, is the weight or force that needs to be moved, lifted, or counteracted using the lever. In real-world examples, the load can be an object being lifted or the force required to perform a specific task.
For example, when using a crowbar to lift a heavy object, the load is the weight of the object. In the case of scissors, the load is the force required to cut the material.
Effort
The effort, also known as the input force, is the force applied to the lever to move or lift the load. This force can be applied by a person, a machine, or another external source. The mechanical advantage of a lever allows the effort to be less than the load, making it easier to perform tasks.
For instance, when using a wheelbarrow, the effort is the force you apply to the handles to lift and move the load. In the case of tweezers, the effort is the force you apply by pinching the tweezer arms together to pick up a small object.
Fulcrum
The fulcrum is the fixed point around which the lever pivots or rotates. It serves as the balance point between the effort and the load. The position of the fulcrum in relation to the effort and the load determines the type of lever and its mechanical advantage.
In a crowbar, the fulcrum is the point where the bar contacts the ground or the surface underneath the object being lifted. For scissors, the fulcrum is the pivot point at the center where the two blades are connected.
Lever arms (input arm and output arm)
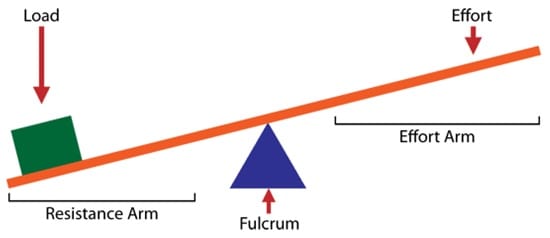
Lever arms are the two sections of the lever on either side of the fulcrum. The input arm (also called the effort arm) is the section of the lever between the fulcrum and the point where the effort is applied. The output arm (also called the load arm or resistance arm) is the section of the lever between the fulcrum and the point where the load is located.
Understanding the relationships between the load, effort, fulcrum, and lever arms is crucial for determining the mechanical advantage and solving lever-related problems. By mastering these concepts, you'll be better prepared to tackle lever questions on mechanical aptitude tests and apply your knowledge of levers to practical situations.
Types of Levers
Looking for prep material on this topic?
Practicing is a proven way to score higher on your Mechanical Aptitude Test. Find full prep packages to ace your assessment!
Levers are classified into three types based on the relative positions of the load, effort, and fulcrum. In this section, we will discuss first-class levers, their definition, examples, and mechanical advantage.
First-class levers
Definition and examples
First-class levers are levers where the fulcrum is located between the effort and the load. In other words, the input force and the output force are applied on opposite sides of the fulcrum. First-class levers can change the direction of the input force, and depending on the relative distances of the effort and load from the fulcrum, they can provide mechanical advantage in terms of force, speed, or distance.
Examples of first-class levers include:
a. Crowbar: When used to lift a heavy object, the fulcrum is placed near the object, the effort is applied at one end, and the load is located at the other end.
b. Scissors: Scissors consist of two first-class levers combined. The pivot point (fulcrum) is at the center, the effort is applied at the handles, and the load is the material being cut.
c. Seesaw: A seesaw is a classic example of a first-class lever. The fulcrum is at the center, and the effort and load are applied at opposite ends.
Mechanical advantage
The mechanical advantage (MA) of a lever is the ratio of the output force (load) to the input force (effort). For first-class levers, the mechanical advantage depends on the lengths of the input arm and the output arm. The formula for calculating the mechanical advantage of a first-class lever is:
Mechanical Advantage (MA) = Length of input arm / Length of output arm
When the input arm is longer than the output arm (effort is farther from the fulcrum than the load), the mechanical advantage is greater than 1, and the lever amplifies the input force. This configuration is useful for tasks that require more force, such as lifting heavy objects or prying open lids.
When the input arm is shorter than the output arm (effort is closer to the fulcrum than the load), the mechanical advantage is less than 1, and the lever increases the speed and distance of movement at the expense of the input force. This configuration is useful for tasks that require more precision or speed, such as cutting with scissors.
By understanding the properties and mechanical advantages of first-class levers, you'll be better equipped to solve lever-related problems and apply your knowledge of levers in practical situations.
Second-class levers
Definition and examples
Second-class levers are levers where the load is positioned between the fulcrum and the effort. In other words, the output force (load) is applied in the middle, between the fulcrum and the input force (effort). Second-class levers always provide a mechanical advantage in terms of force, as they enable the user to apply less effort to lift or move the load.
Examples of second-class levers include:
a. Wheelbarrow: A wheelbarrow is used to transport heavy loads. The fulcrum is the wheel, the effort is applied at the handles, and the load is located between the fulcrum and the effort.
b. Nutcracker: A nutcracker uses a second-class lever to crack open nuts. The fulcrum is at one end, the effort is applied at the other end, and the nut (load) is placed between the fulcrum and the effort.
c. Bottle opener: A bottle opener uses a second-class lever to remove bottle caps. The fulcrum is the part of the opener that rests on the bottle, the effort is applied at the handle, and the load is the force required to lift the bottle cap.
Mechanical advantage
The mechanical advantage (MA) of a second-class lever is determined by the relative lengths of the input arm and the output arm. The formula for calculating the mechanical advantage of a second-class lever is:
Mechanical Advantage (MA) = Length of input arm / Length of output arm
In second-class levers, the input arm is always longer than the output arm, meaning the effort is farther from the fulcrum than the load. This configuration results in a mechanical advantage greater than 1, allowing the user to apply less force than the weight of the load.
For example, if the length of the input arm (from the fulcrum to the effort) is 40 cm and the length of the output arm (from the fulcrum to the load) is 10 cm, the mechanical advantage would be:
MA = 40 cm / 10 cm = 4
In this case, the mechanical advantage of 4 means that the effort required to lift or move the load is only one-fourth of the weight of the load.
By understanding the properties and mechanical advantages of second-class levers, you'll be better prepared to solve lever-related problems and apply your knowledge of levers in practical situations.
Third-class levers
Definition and examples
Third-class levers are levers where the effort is positioned between the fulcrum and the load. In other words, the input force (effort) is applied in the middle, between the fulcrum and the output force (load). Third-class levers typically provide a mechanical advantage in terms of speed and distance, as they enable the user to move the load with greater speed and over a larger distance, but at the expense of increased effort.
Examples of third-class levers include:
a. Tweezers: Tweezers are used to pick up small objects. The fulcrum is at one end, the load is located between the fulcrum and the effort, and the effort is applied at the other end.
b. Broom: A broom uses a third-class lever to sweep debris. The fulcrum is where the broom handle rests against the floor, the load is the debris being swept, and the effort is applied by the person holding the broom handle.
c. Baseball bat: When swinging a baseball bat, the fulcrum is the point where the bat is held by the batter, the load is the force required to hit the ball, and the effort is applied by the batter's arms between the fulcrum and the load.
Mechanical advantage
The mechanical advantage (MA) of a third-class lever is determined by the relative lengths of the input arm and the output arm. The formula for calculating the mechanical advantage of a third-class lever is:
Mechanical Advantage (MA) = Length of input arm / Length of output arm
In third-class levers, the input arm is always shorter than the output arm, meaning the effort is closer to the fulcrum than the load. This configuration results in a mechanical advantage less than 1, requiring the user to apply more force than the weight of the load. However, this setup allows for greater speed and distance of movement, making third-class levers suitable for tasks that require precision, control, or agility.
For example, if the length of the input arm (from the fulcrum to the effort) is 5 cm and the length of the output arm (from the fulcrum to the load) is 20 cm, the mechanical advantage would be:
MA = 5 cm / 20 cm = 0.25
In this case, the mechanical advantage of 0.25 means that the effort required to move the load is four times greater than the weight of the load. However, the load will move four times faster and over a greater distance than the effort.
By understanding the properties and mechanical advantages of third-class levers, you'll be better equipped to solve lever-related problems and apply your knowledge of levers in practical situations.
Lever Principles and Mechanical Advantage
Looking for prep material on this topic?
Practicing is a proven way to score higher on your Mechanical Aptitude Test. Find full prep packages to ace your assessment!
Law of the Lever
The law of the lever is a fundamental principle governing the operation of levers. It states that when a lever is in equilibrium (balanced), the product of the effort force and the length of the input arm is equal to the product of the load force and the length of the output arm. In mathematical terms, this principle can be expressed as:
Effort x Input arm length = Load x Output arm length
This principle can be used to calculate the effort required to balance a lever, the load that can be lifted with a given effort, or the position of the fulcrum needed to balance the lever. The law of the lever is derived from the principle of moments, which states that for a system to be in equilibrium, the sum of the clockwise moments (torques) around a pivot point must be equal to the sum of the counterclockwise moments.
Let's explore an example to illustrate the law of the lever:
Suppose you have a first-class lever with an input arm length of 3 meters and an output arm length of 1 meter. If the load on the output arm is 60 kg, what effort is required to balance the lever?
Using the law of the lever:
Effort x Input arm length = Load x Output arm length
Effort x 3 meters = 60 kg x 1 meter
Effort = (60 kg x 1 meter) / 3 meters
Effort = 20 kg
In this case, an effort of 20 kg is required to balance the lever. The mechanical advantage of the lever can be calculated as:
Mechanical Advantage (MA) = Length of input arm / Length of output arm
MA = 3 meters / 1 meter
MA = 3
The mechanical advantage of 3 indicates that the effort required to balance the lever is one-third of the load.
By understanding and applying the law of the lever, you can analyze and solve lever-related problems, making you better prepared to tackle lever questions on mechanical aptitude tests and apply your knowledge of levers to practical situations.
Calculating Mechanical Advantage
Formula
The mechanical advantage (MA) of a lever is the ratio of the output force (load) to the input force (effort). In simpler terms, it describes how effectively a lever amplifies the input force to perform work. The formula for calculating the mechanical advantage of a lever is:
Mechanical Advantage (MA) = Length of input arm / Length of output arm
This formula can be used for all three types of levers – first-class, second-class, and third-class. The mechanical advantage helps you understand the efficiency of a lever system and how it can be optimized for specific tasks.
Examples
Let's explore some examples to understand how to calculate the mechanical advantage for different types of levers.
Example 1: (First-class lever) A crowbar is used to lift a heavy object. The length of the input arm (from the fulcrum to the effort) is 75 cm, and the length of the output arm (from the fulcrum to the load) is 25 cm. What is the mechanical advantage of the crowbar?
MA = Length of input arm / Length of output arm MA = 75 cm / 25 cm MA = 3
In this case, the mechanical advantage of 3 means that the effort required to lift the heavy object is one-third of the weight of the object.
Example 2: (Second-class lever) A wheelbarrow is used to transport a load. The length of the input arm (from the fulcrum to the effort) is 120 cm, and the length of the output arm (from the fulcrum to the load) is 40 cm. What is the mechanical advantage of the wheelbarrow?
MA = Length of input arm / Length of output arm MA = 120 cm / 40 cm MA = 3
In this case, the mechanical advantage of 3 means that the effort required to lift the load is one-third of the weight of the load.
Example 3: (Third-class lever) A person is using a broom to sweep debris. The length of the input arm (from the fulcrum to the effort) is 20 cm, and the length of the output arm (from the fulcrum to the load) is 80 cm. What is the mechanical advantage of the broom?
MA = Length of input arm / Length of output arm MA = 20 cm / 80 cm MA = 0.25
In this case, the mechanical advantage of 0.25 means that the effort required to move the debris is four times greater than the weight of the debris. However, the debris will move four times faster and over a greater distance than the effort.
Understanding how to calculate the mechanical advantage of levers is essential for analyzing lever systems and solving lever-related problems, both in mechanical aptitude tests and real-world applications.
Understanding the Relationship between Effort, Load, and Distance
In a lever system, there is a direct relationship between the effort applied, the load lifted or moved, and the distance over which these forces act. This relationship is essential to understand when analyzing the efficiency and effectiveness of a lever system.
Effort and distance: When the effort applied to a lever increases, the distance over which the load moves also increases, provided the lever's mechanical advantage remains constant. Conversely, if less effort is applied, the load will move over a shorter distance.
Load and distance: When the weight of the load increases, a greater effort is required to lift or move the load over the same distance. Conversely, if the weight of the load decreases, less effort is needed to move the load over the same distance.
Mechanical advantage: As the mechanical advantage of a lever increases, the effort required to lift or move the load decreases, while the distance over which the load moves increases. Conversely, as the mechanical advantage decreases, the effort required to lift or move the load increases, and the distance over which the load moves decreases.
Understanding the relationship between effort, load, and distance is crucial when working with levers, as it helps you optimize the lever system for specific tasks and improve overall efficiency.
Conservation of Energy in Levers
The principle of conservation of energy states that energy cannot be created or destroyed but can only change from one form to another. In the context of levers, this means that the work input (effort) must be equal to the work output (load) when taking into account any energy losses due to factors such as friction.
Work is defined as the force applied to an object multiplied by the distance over which the force is applied. Mathematically, this can be expressed as:
Work = Force x Distance
In a lever system, the work input (effort) can be represented as:
Work input = Effort x Distance of input arm
Similarly, the work output (load) can be represented as:
Work output = Load x Distance of output arm
For an ideal lever system without any energy losses, the work input will be equal to the work output, which can be expressed as:
Effort x Distance of input arm = Load x Distance of output arm
This relationship shows that, in a lever system, the product of the effort and the distance over which it acts must be equal to the product of the load and the distance over which it acts. This principle helps ensure the conservation of energy in the lever system.
By understanding the conservation of energy principle in levers, you can analyze the efficiency of lever systems, identify potential energy losses, and optimize the system for improved performance.
Solving Lever Problems
Looking for prep material on this topic?
Practicing is a proven way to score higher on your Mechanical Aptitude Test. Find full prep packages to ace your assessment!
Identifying Lever Types in Word Problems
When solving lever problems, it's essential first to identify the type of lever being described in the problem. This can be done by looking for clues in the problem statement and understanding the key characteristics of each lever class:
- First-class lever: The fulcrum is between the effort and the load (e.g., a seesaw or crowbar).
- Second-class lever: The load is between the fulcrum and the effort (e.g., a wheelbarrow or nutcracker).
- Third-class lever: The effort is between the fulcrum and the load (e.g., a pair of tweezers or a broom).
By recognizing the lever type, you can apply the appropriate formulas and principles to analyze the problem and find the solution.
Analyzing Lever Components (Load, Effort, Fulcrum, Lever Arms)
Once you've identified the type of lever in the problem, you need to analyze the components of the lever system. Here are some tips for extracting relevant information from word problems:
- Load: Look for the weight or force of the object being lifted or moved.
- Effort: Identify the force applied to move the load.
- Fulcrum: Determine the pivot point's location, which may be explicitly stated or implied in the problem.
- Lever arms: Calculate or estimate the input and output arm lengths based on the information given.
Calculating Mechanical Advantage
After analyzing the lever components, you can calculate the mechanical advantage (MA) using the formula:
Mechanical Advantage (MA) = Length of input arm / Length of output arm
The MA helps you understand how effectively the lever amplifies the input force to perform work, and it can be used to compare the efficiency of different lever systems.
Determining Unknown Forces or Distances
With the lever components analyzed and the mechanical advantage calculated, you can now solve for any unknown forces or distances in the problem. Use the law of the lever and other relevant formulas to determine the unknown values:
- To find the unknown effort: Effort = (Load x Length of output arm) / Length of input arm
- To find the unknown load: Load = (Effort x Length of input arm) / Length of output arm
- To find the unknown input arm length: Length of input arm = (Load x Length of output arm) / Effort
- To find the unknown output arm length: Length of output arm = (Effort x Length of input arm) / Load
By following these steps to identify the lever type, analyze the components, calculate the mechanical advantage, and determine unknown forces or distances, you can successfully solve a wide range of lever problems. This will not only help you excel in mechanical aptitude tests but also apply your knowledge of levers to real-world situations.
Conclusion
Looking for prep material on this topic?
Practicing is a proven way to score higher on your Mechanical Aptitude Test. Find full prep packages to ace your assessment!
In conclusion, a strong understanding of levers, their components, types, and principles is crucial for solving lever problems, both on mechanical aptitude tests and in real-world applications. Through this guide, we have explored the fundamentals of levers and provided a step-by-step approach to analyze and solve lever-related problems effectively.
To recap, we covered the following key topics in detail:
Identifying Lever Types in Word Problems: We discussed how to recognize the type of lever described in a word problem by understanding the key characteristics of each lever class.
Analyzing Lever Components: We explored how to extract relevant information about the load, effort, fulcrum, and lever arms from word problems.
Calculating Mechanical Advantage: We explained how to compute the mechanical advantage using the formula and how it helps assess a lever's efficiency.
Determining Unknown Forces or Distances: We provided formulas to solve for unknown forces or distances in lever problems by applying the law of the lever and other relevant formulas.
By following this guide and applying the concepts discussed, you will be better equipped to tackle lever-related problems and make informed decisions when working with levers in various mechanical systems. As you continue to practice and apply these concepts, your confidence and expertise in solving lever problems will grow, setting you up for success in mechanical aptitude tests and real-life applications.